Introduction
Knowing your Chromebook’s board name is essential for various tasks, such as troubleshooting issues, updating firmware, or installing a custom operating system. The board name provides detailed information about hardware specifics. Whether you are a tech enthusiast or a regular user, discovering this information can be both useful and straightforward. This guide aims to help you find your Chromebook’s board name effortlessly through multiple methods.
Understanding Chromebook Hardware
Chromebooks are designed for simplicity and efficiency, powered by a range of hardware configurations. The hardware components of a Chromebook include a motherboard, CPU, RAM, storage, and peripheral interface devices. The motherboard, often referred to as the ‘board,’ serves as the central hub, connecting all these components. Different Chromebooks have different board names, which are crucial identifiers for developers, support teams, and advanced users.
Knowing the board name can help determine compatibility with updates and new features. It also assists in identifying hardware capabilities and limitations, ensuring you can make the most out of your device. Whether you plan to upgrade your Chromebook, troubleshoot issues, or delve into software development, the board name is a key piece of information.
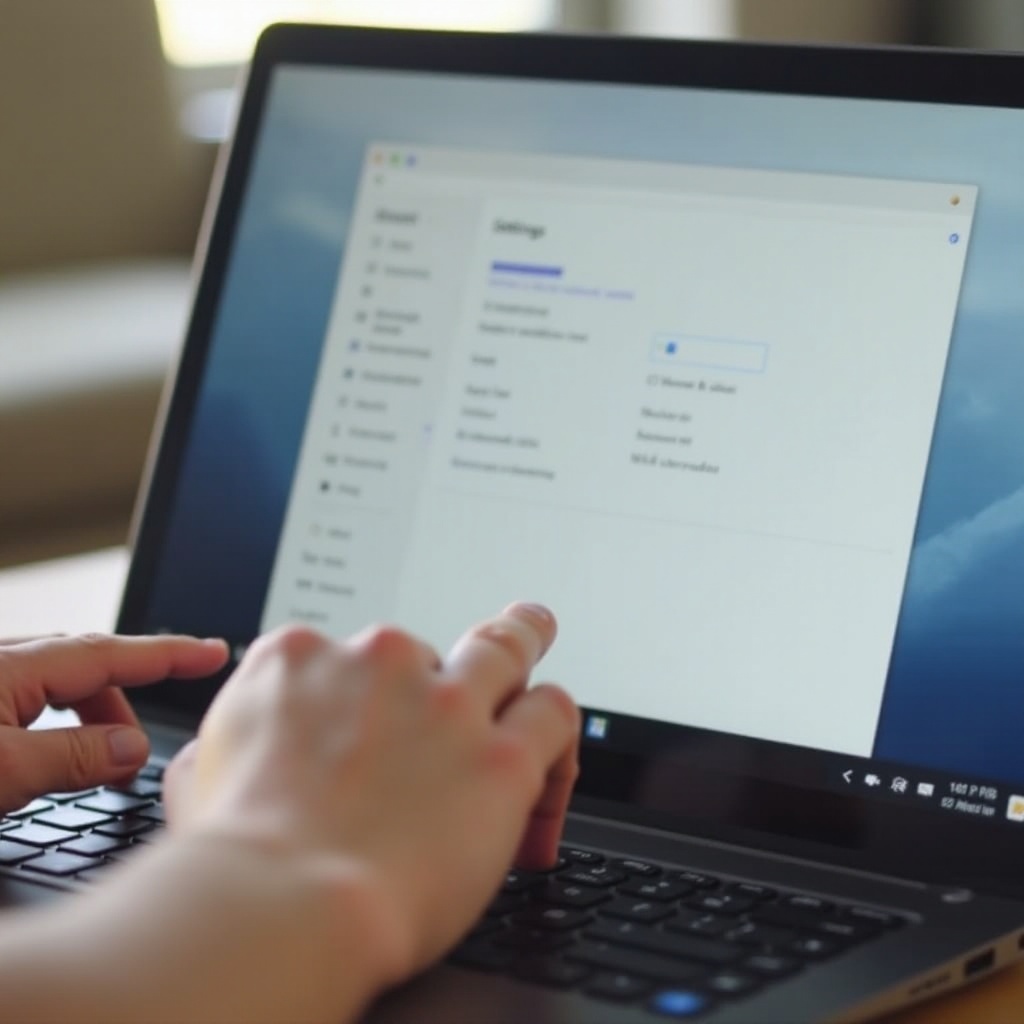
Checking the Board Name via Chrome OS Settings
Chromebooks are designed to be user-friendly, and checking the board name through Chrome OS settings is one of the simplest methods. Here’s how you can do it:
- Open Settings: Click on the time display at the bottom right corner of your screen, then click on the gear icon to open settings.
- About Chrome OS: Scroll down and select ‘About Chrome OS’ which provides essential information about your device.
- Detailed Build Information: Within the ‘About Chrome OS’ section, click on the ‘Detailed build information’ link. This will display an array of details regarding your Chromebook.
- Identify Board Name: Under the detailed build information, you’ll see various fields like CHROMEOS_RELEASE_NAME and CHROMEOS_RELEASE_BOARD. The CHROMEOS_RELEASE_BOARD field contains your board name, represented in a specific format like ‘octopus-some-code.
By following these steps, you can easily identify your Chromebook’s board name without needing to delve deep into the system or use complex commands.

Using the Crosh Shell
For those who prefer a more technical route, the Crosh shell offers a command-line interface to access deeper system information.
Accessing Crosh Shell
Accessing the Crosh shell is straightforward and involves a few quick steps:
1. Open Chrome Browser: Ensure you are on the desktop and have the Chrome browser open.
2. Launch Crosh: Press Ctrl + Alt + T to open the Crosh terminal.
The Crosh shell is now ready for commands, providing a powerful interface to interact with your Chromebook’s underlying system.
Commands to Find Board Name
Within the Crosh shell, specific commands help unveil your board name:
1. Enter Commands: Type shell and press Enter to access the deeper shell.
2. Retrieve Board Name: Run the command sudo crossystem and look for the entry ‘hwid.’ The hwid (Hardware ID) entry reveals your board name.
These commands provide a direct method to uncover your Chromebook’s board name through the terminal interface.
Utilizing Developer and Recovery Modes
Developer and Recovery modes offer additional ways to access detailed hardware information. If you are comfortable with more advanced techniques, these modes provide alternate methods to find your board name.
- Enter Developer Mode: Power off your Chromebook, then hold the
Esc + Refreshkeys and press the power button. Release the keys when a warning screen appears. PressCtrl + Dand thenEnterto activate developer mode. - Access Board Name: With developer mode enabled, follow the steps mentioned previously to open the Crosh shell and run the
sudo crossystemcommand.
Alternatively, in Recovery mode:
1. Enter Recovery Mode: Power off your Chromebook, hold the Esc + Refresh keys, and press the power button. Release when the recovery screen appears.
2. Retrieve Information: On the recovery screen, some models display the board name directly within the on-screen text.
Both modes provide comprehensive access to your device’s hardware specifics, including the board name.

Using Third-Party Tools
Apart from built-in options, third-party tools can also reveal your board name. Tools such as CPU-Z or AIDA64 provide detailed hardware analysis and can be a handy alternative.
- Download & Install: Download your chosen tool from a credible source and install it on your Chromebook.
- Run the Tool: Open the application, navigate to the system or hardware section, and locate the motherboard or board information.
These tools offer extensive details about your Chromebook’s internals, including the board name, making them a practical alternative to built-in methods.
Conclusion
Discovering your Chromebook’s board name is a straightforward task with various methods available. Whether you prefer using Chrome OS settings, the Crosh shell, developer and recovery modes, or third-party tools, this information is readily accessible. Knowing your board name can be invaluable for troubleshooting, updating, and optimizing your device, making it a crucial piece of information for all users.
Frequently Asked Questions
Why do I need my Chromebook’s board name?
The board name is crucial for identifying specific hardware configurations, ensuring compatibility with updates, and technical support. It’s also vital for developers and enthusiasts looking to customize or troubleshoot their Chromebooks.
What if I can’t find my board name through the settings?
If the settings method isn’t working, try using the Crosh shell, entering developer/recovery modes, or employing third-party diagnostic tools. Each method offers an alternative way to uncover your board name.
Are there risks involved in using developer mode on my Chromebook?
Enabling developer mode can pose security risks as it disables certain security features. It may also void your warranty and lead to potential data loss. Use it with caution and ensure you have backups of important data before proceeding.